Create topics
Now that the initial structure of the agent has been created, your next step is to start writing topics. Topics define how customers interact with the agent, and they generally represent common problems, questions, or tasks for which customers may need help. For example, you might create a topic to provide customers with instructions on returning an item.
Each topic consists of two main elements:
- Trigger phrases – Phrases, keywords, or questions entered by users and related to a specific issue.
- Conversation nodes – Define how an agent should respond and what it should do.
You can design topics by customizing the provided templates, creating a new one, or using a suggested topic from existing sites. Your agent can have up to 1,000 topics.
Getting started with topics
Each agent created includes several predefined topics to help you get started. These predefined topics are divided into two types:
- Custom – Pre-created user topics include key elements of the agent such as greeting, goodbye, and start over, which can help you understand simple and complex ways to use nodes to create agent conversations.
- System – Pre-filled topics that represent common use cases that may occur during a conversation with an agent, such as escalation or ending a conversation.
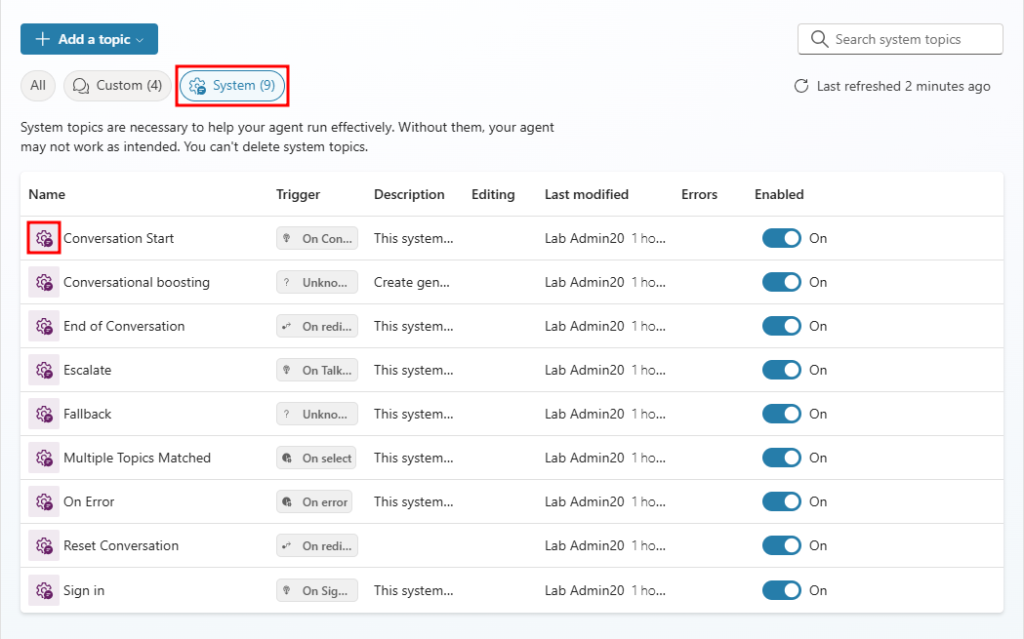
System topics
System topics represent scenarios that customers are likely to encounter when interacting with your agent. These scenarios may include a topic that describes what to do when multiple topics match, or ending a conversation, or escalating to a human agent. System topics already have a basic structure in place, depending on the scenario. For example, the fallback topic represents the topic presented to a user when the agent is unable to identify a topic that answers their question. System topics can be modified to suit your needs.
Create topics
You define additional topics by selecting Topics in the side navigation pane, then selecting Add at the top of the page. There are two options for creating topics:
- From scratch: Opens a new blank topic. You create everything, from triggers to the conversation flow, and so on.
- Create from a description: Uses Copilot to help you create your topic. You provide a few basic details about what you want, and the topic is created.
Each topic you define must include trigger phrases. Trigger phrases are examples of text such as questions or statements that teach the agent when to respond with this dialogue. For example, the following image contains a topic called Store opening hours, which is used to provide customers with store hours based on different scenarios.
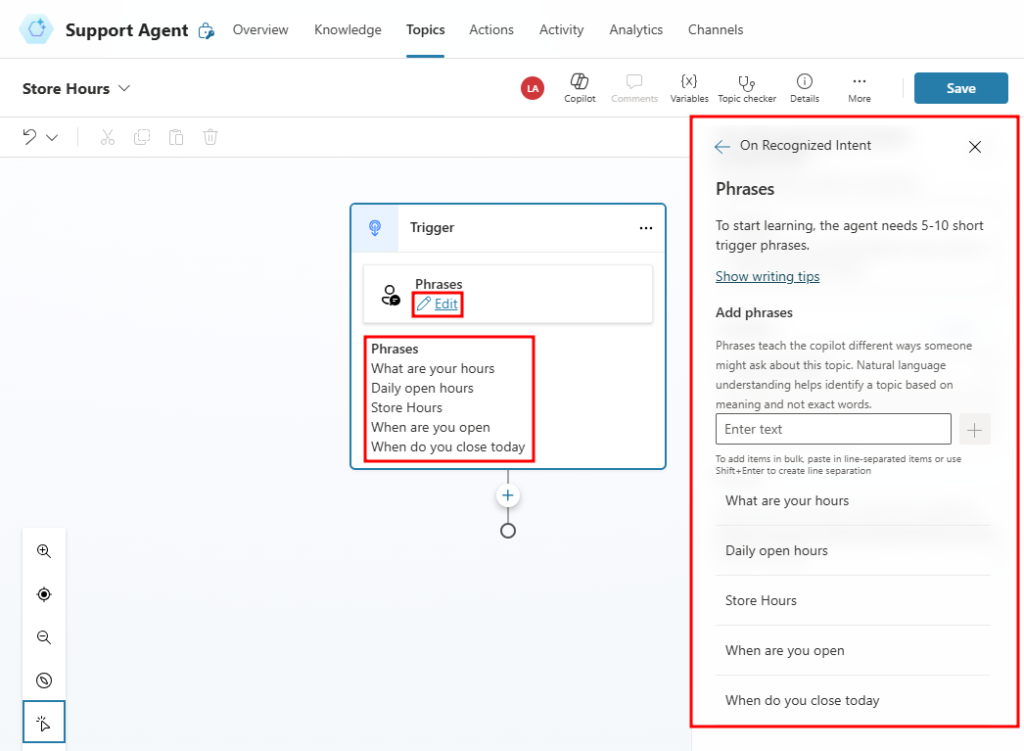
Six trigger phrases have been added, such as What are your hours? and When are you open? These phrases are used to determine when the Store opening hours topic should be launched. The more trigger phrases you add, the more likely the topic will be used correctly. Trigger phrases must be unique to each topic. If you have the same trigger phrase in multiple topics, the agent cannot identify which topic to load. After adding the initial triggers, select Save topic to add the topic to the list of topics. Additional triggers can be added later if needed.
Once you have defined your trigger phrases, you can define how customers are guided through their conversational interaction with the topic. The editing canvas is a graphical dialog tree editor that allows you to define the agent’s responses and the overall conversation flow.
Work with conversation nodes
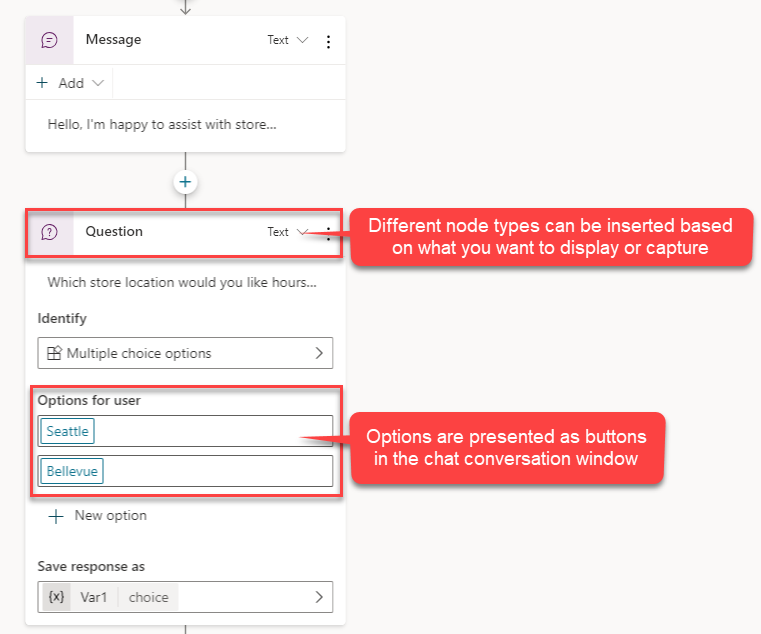
Conversation nodes help define the path the conversation takes. Conversation nodes can display messages, ask questions, or perform actions. You can add these nodes by selecting the plus sign (+) under the node. For example, if you want to provide store hours based on where the customer lives, you would add an Ask a question node to identify which store they want the hours for.
The following image shows the Ask a question node used to ask the customer which store they want the hours for. In addition, customers have two multiple-choice options: Seattle and Bellevue.
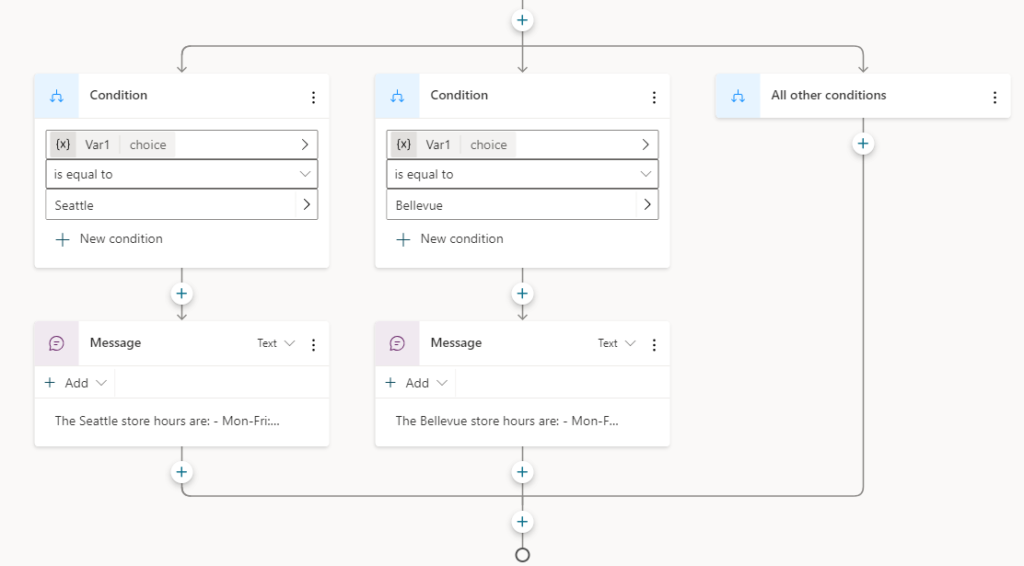
Distinct conversation paths are created based on the customer’s response. In the branched conversation path, each node automatically checked Seattle in one path and Bellevue in the other path to perform the appropriate next step. Additional nodes can be added for each path depending on what you want it to do.
The following image shows that for each path, a Message node is added to provide the store hours for that specific location.
You now have a simple dialog tree with branches and can create more complex versions of this tree. You can integrate variables, entities, and Power Automate flows.
Use generative responses with content search and synthesis
Once you have defined the content you want to leverage with generative AI, this data will be used for fallback generative responses. However, you may encounter scenarios where generative responses would be useful in specific topics of your agent. You can achieve this by using the Create generative responses node. This special node allows you to specify additional sources that will be searched based on your inputs. The information sources defined in the Generative responses node override the sources you specified at the agent level, which act as a fallback solution.
When using generative response nodes, you have the option to use modern knowledge sources or classic data.
Knowledge sources include:
External sources:
- Public websites
Internal resources:
- Text documents
- SharePoint
- Dataverse
- Business data via Microsoft Graph connectors
Note
Knowledge sources in generative response nodes currently do not support Bing Custom Search, Azure OpenAI, or custom data. Instead, in the properties of the generative response node, use the Classic data option for Bing Custom Search, Azure OpenAI, or custom data sources.
Classic data sources include:
External resources:
- General AI knowledge
- Bing Web Search
- Bing Custom Search
Internal resources:
- Azure OpenAI on your data
- Documents uploaded to Dataverse
- SharePoint (only certain file formats are supported)
- Custom data (internal or external)
To learn more about the different available data sources, see: Use generative responses in a topic.
Generative responses can be added to a topic by selecting the plus icon to open the new nodes menu, then under Advanced, selecting Generative responses. This will create a new node called Create generative responses.
You can specify and configure your new data sources. To learn more about configuring the different options, use the links below:
- Search public data or use Bing Custom Search for generative responses
- Connect your data to Azure OpenAI for generative responses
- Use uploaded documents for generative responses
- Use content on SharePoint or OneDrive for generative responses
- Use a custom data source for generative responses
Connect agents to Microsoft 365 substrate data
Through the association of Microsoft Graph connectors, Microsoft 365 substrate data can be brought into your agent and used as knowledge sources. Creators will be able to add these knowledge sources to their agents completely without code. The supported knowledge sources in the Microsoft 365 substrate are SharePoint and Microsoft Graph connectors.
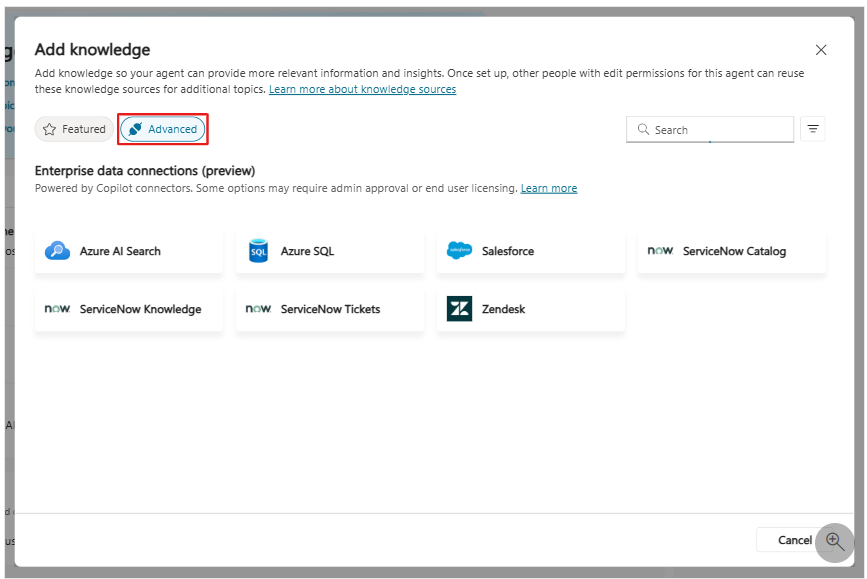
Adding Microsoft 365 substrate data sources to your agent is relatively simple. Start from the agent Overview page and select Add knowledge in the Knowledge section. This will open the Add knowledge window. There you will find a Featured tab and an Advanced tab; among these tabs, SharePoint and the following Microsoft Graph connectors can be used to add Microsoft 365 substrate data to your agent:
- ServiceNow
- Azure SQL
- Salesforce
- Zendesk
Once added to your agent, Microsoft 365 substrate data can then be integrated in the form of Generative Responses nodes or referenced by an agent configured in Generative Orchestration mode.
