GitHub is a collaborative platform
Collaboration is at the core of everything GitHub does. We went over repositories in the first unit of the module and learned that repositories help you organize your project and its files. In the last unit, we learned about pull requests, which is a way to keep track of changes made to your project.
In this unit, we’re learning about issues and discussions. These are features that contribute to the collaborative nature of the GitHub Enterprise Platform.
Issues
GitHub Issues are used to track ideas, feedback, tasks, or bugs for work on GitHub. Issues can be created in various ways, so you can choose the most convenient method for your workflow.
This walkthrough covers how to create an issue from a repository. Issues can also be created from:
- An item in a task list.
- A note in a project.
- A comment in an issue or pull request.
- A specific line of code.
- A URL query.
Creating an issue from a repository
- On GitHub.com, navigate to the main page of the repository.
- Under your repository name, select Issues.

- Select New issue.
- If your repository uses issue templates, next to the type of issue you’d like to open select Get started.If the type of issue you’d like to open isn’t included in the available options, select Open a blank issue. If not using templates, skip to Step 5.If your repository uses issue forms, you’ll see a structured form to fill out instead of a blank issue template. Issue forms allow maintainers to collect specific information in a standardized format.
- In the Add a title field, enter a title for your issue.
- In the Add a description field, type a description of your issue.
- If you’re a project maintainer, you can assign the issue to someone, add it to a project board, associate it with a milestone, or apply a label.
- When you’re finished, select Submit new issue.
Use labels, mentions, and reactions to manage collaboration effectively and increase issue visibility. Issue templates help maintain consistent structure and expectations for contributors.
Some conversations may be more appropriate for GitHub Discussions. Use GitHub Discussions to ask and answer questions, share information, make announcements, and conduct or participate in conversations about a project.
In the next section, we’ll review Discussions and how to best utilize the feature.
Discussions
Discussions are designed for conversations that aren’t necessarily tied to code—such as Q&A, ideas, or general feedback. They support open, ongoing communication within a shared forum and can be public or private, depending on the repository’s visibility.
In this section, you’ll learn how to:
- Enabling a discussion in your repository.
- Creating a new discussion and various discussion categories.
Let’s dive into enabling a discussion in your repository.
Enabling a discussion in your repository
Repository owners and those with Write access can enable GitHub Discussions for a community on their public and private repositories. The visibility of a discussion inherits visibility from the repository they’re created in.
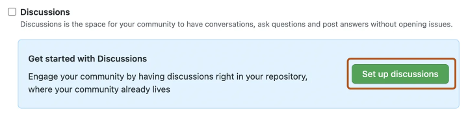
When you first enable GitHub Discussions, you’re prompted to configure a welcome post.
- On GitHub.com, navigate to the main page of the repository.
- Under your repository name, select Settings.

Scroll down to the Features section and under Discussions, select Setup discussions.
- Under Start a new discussion, edit the template to match your community’s tone and resources.
- Select Start discussion.
You’re now ready to create a new discussion.
Create a new discussion
Any authenticated user who can view the repository can create a discussion in that repository. For organization-level discussions, any user who can view the source repository can also create a discussion.
- On GitHub.com, navigate to the main page of the repository or organization where you want to start a discussion.
- Under your repository or organization name, select Discussions.

- On the right side of the page, select New discussion.
- Select a discussion category by choosing Get started. All discussions must be placed in a category. Repository maintainers define these categories.
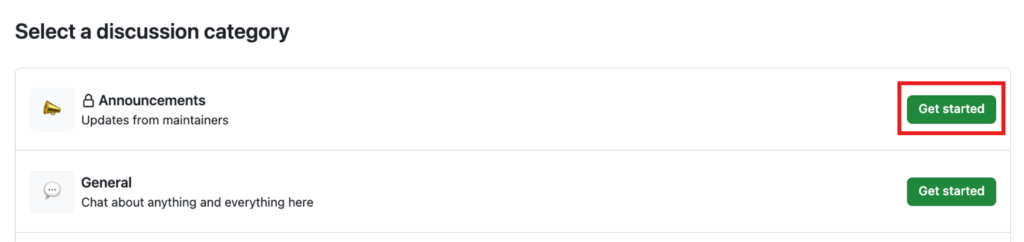
Each discussion category includes a unique name, emoji, and description to clarify its purpose. Categories help maintainers organize how conversations are filed. They’re customizable to help distinguish categories that are Q&A or more open-ended conversations. The following table shows the default categories for discussions and their purpose.
| Category | Purpose | Format |
|---|---|---|
| 📣 Announcements | Updates and news from project maintainers | Announcement |
| #️⃣ General | Anything and everything relevant to the project | Open-ended discussion |
| 💡 Ideas | Ideas to change or improve the project | Open-ended discussion |
| 🗳️ Polls | Polls with multiple options for the community to vote for and discuss | Polls |
| 🙏 Q&A | Questions for the community to answer, with a question/answer format | Question and Answer |
| 🙌 Show and tell | Creations, experiments, or tests relevant to the project | Open-ended discussion |
Repository maintainers can pin important discussions to the top of the Discussions tab for better visibility.
- Under Discussion title enter a title for your discussion, and under Write enter the body of your discussion.
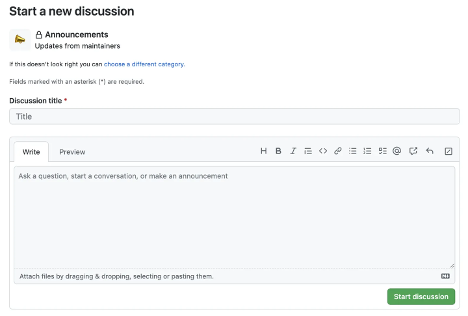
- Select Start discussion.
That covers how GitHub supports collaboration through Issues and Discussions. Now let’s move to how you can manage notifications, subscribe to threads, and get started with GitHub pages.
Marking a comment as an answer
In a Q&A style discussion, you can mark a comment as the accepted answer to the original question.
- Navigate to the discussion.
- Locate the comment that best answers the original question.
- Select Mark as answer below the comment.
The comment will be highlighted, making it easy for others to find the solution quickly. You can also unmark an answer if needed.
Converting a discussion to an issue
If a discussion leads to work that needs to be tracked, you can convert the discussion into an issue.
- Navigate to the discussion you want to convert.
- Select the
...(three dots) menu at the top-right of the discussion. - Select Convert to issue.
- Confirm the conversion and select a repository to create the new issue in.
This keeps track of actionable work that originates from community conversations.
Pinning a discussion
You can pin important discussions to the top of the Discussions page for better visibility.
- Navigate to the discussion you want to pin.
- Select the
...(three dots) menu at the top-right of the discussion. - Select Pin discussion.
Pinned discussions are helpful for highlighting announcements, important questions, or ongoing topics the community should notice.
