How does GitHub Actions automate development tasks?
Here, we introduce GitHub Actions and workflows.
You will learn about the types of actions you can use and where to find them. You will also see examples of these actions and how they fit into a workflow.
GitHub reduces the time from idea to deployment
GitHub is designed to help developer and DevOps teams build and deploy applications quickly. Many GitHub features enable these efficiency gains, which generally fall into two main categories:
- Communication: GitHub facilitates collaboration among team members through code reviews in pull requests, issues, project boards, wikis, notifications, and more.
- Automation: GitHub Actions allows your team to automate workflows at every stage of the software development process—from integration to delivery to deployment. You can even automate adding labels to pull requests or detecting stale issues.
Combined, these features have helped thousands of development teams effectively reduce the time between the initial idea and deployment.
Use workflow automation to reduce development time
In this module, we focus on automation. Let’s take a moment to understand how teams can use automation to reduce the time required to execute a typical development and deployment workflow.
Consider all the tasks that need to be completed after writing code but before it can be used reliably. Depending on your organization’s goals, you will likely need to:
- Verify that the code passes all unit tests.
- Perform quality and compliance checks to ensure the code meets organizational standards.
- Analyze the code and its dependencies for known security vulnerabilities.
- Compile the code by integrating contributions from multiple developers.
- Verify that the software passes integration tests.
- Define the version of the new build.
- Deliver the new binary files to the appropriate location.
- Deploy the binaries to one or more servers.
- Identify failed tasks and notify the responsible person or team.
The challenge is to execute these tasks reliably, consistently, and sustainably. This is an ideal case for workflow automation. If you already use GitHub, it makes sense to set up this automation with GitHub Actions.
What is GitHub Actions?
GitHub Actions are packaged scripts that automate tasks in a software development workflow on GitHub. You can configure GitHub Actions to trigger complex workflows tailored to your organization’s needs. The trigger can be a code push to a branch, a defined time interval, or a manual action. The result is an automated, reliable, and sustainable workflow that significantly reduces development time.
Where can you find GitHub Actions?
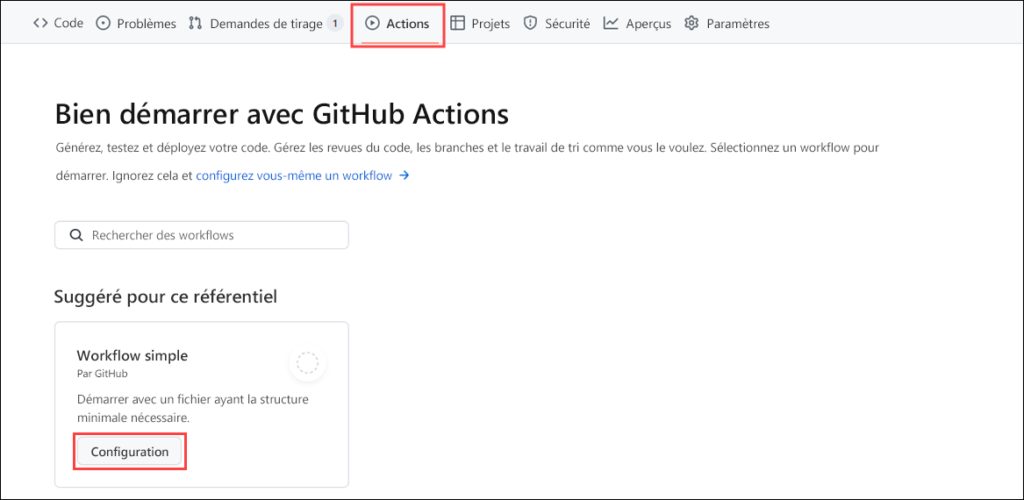
GitHub Actions are scripts in YAML (.yml) data format. Each GitHub repository has an Actions tab that makes it easy to start configuring your first script. If you find a workflow that seems like a good starting point, simply click the Configure button to add the script and begin editing the YAML source file.
Beyond the GitHub Actions offered in the Actions tab, you can also:
- Search for GitHub Actions in the GitHub Marketplace: The Marketplace allows you to discover and purchase tools that extend your workflows.
- Explore open-source projects: For example, the GitHub Actions organization offers many popular open-source repositories containing actions you can use.
- Write your own GitHub Actions from scratch: You can make them open source or even publish them on the GitHub Marketplace.
Using open-source GitHub Actions
Many GitHub Actions are open source and available to everyone. However, as with any open-source software, it’s important to review them carefully before integrating them into your project. Here are some best practices to follow, similar to the community standards recommended for open-source projects (README, code of conduct, contribution file, issue templates, etc.):
- Review the action.yml file of the action to understand inputs, outputs, and verify that the code does what it claims to do.
- Check if the action is listed on the GitHub Marketplace: While not mandatory, this can be a sign of quality.
- Check if the action is verified on the Marketplace: A verified action has been approved by GitHub, but it’s still recommended to review it before use.
- Specify the version of the action used by referencing a Git ref, SHA, or tag to ensure stability.
Types of GitHub Actions
There are three types of GitHub Actions:
- Container-based actions
- The runtime environment is part of the action’s code.
- These actions can only run in a Linux environment hosted by GitHub.
- They support many programming languages.
- JavaScript actions
- The environment is not included in the code.
- You must specify the runtime environment.
- These actions can run in a virtual machine (VM) in the cloud or on-premises.
- Compatible with Linux, macOS, and Windows.
- Composite actions
- Allow combining multiple workflow steps into a single action.
- For example, you can group several run commands into one action and then execute these commands as a single step in a workflow.
Anatomy of a GitHub Action
Here is an example of an action that performs a Git checkout of a repository.
The action actions/checkout@v1 is part of a step in a workflow. This step also compiles the Node.js code extracted from the repository.
steps:
  - uses: actions/checkout@v1
  - name: npm install and build webpack
    run: |
      npm install
npm run buildSuppose you want to use a container-based action to run containerized code.
Your action might look like this:
name: "Hello Actions"
description: "Greet someone"
author: "octocat@github.com"

inputs:
    MY_NAME:
      description: "Who to greet"
      required: true
      default: "World"

runs:
    uses: "docker"
    image: "Dockerfile"

branding:
    icon: "mic"
color: "purple"Notice the inputs section.
Here, you retrieve the value of a variable called MY_NAME. This variable is defined in the workflow that runs this action.
In the runs section,
you specify docker in the uses attribute. When you set this value, you must provide the path to the Docker image file—in this case, Dockerfile.
We won’t go into Docker details here, but if you want to learn more, see the module Introduction to Docker Containers.
The last section, branding,
customizes your action in the GitHub Marketplace if you decide to publish it.
You can check the full list of action metadata in the documentation: Metadata syntax for GitHub Actions.
What is a GitHub Actions workflow?
A GitHub Actions workflow is a process you configure in your repository to automate software development lifecycle tasks, including running GitHub Actions.
With a workflow, you can build, test, package, publish, and deploy any project on GitHub.
To create a workflow, you add actions in a .yml file located in the .github/workflows directory of your GitHub repository.
In the upcoming exercise, your workflow file main.yml will look like this example:
name: A workflow for my Hello World file
on: push
jobs:
  build:
    name: Hello world action
    runs-on: ubuntu-latest
    steps:
    - uses: actions/checkout@v1
    - uses: ./action-a
      with:
MY_NAME: "Mona"Notice the on attribute:
Its value is a trigger that specifies when this workflow should run.
In this example, it is triggered when an event of type push occurs on your repository.
You can specify:
- a single event like
on: push, - an array of events like
on: [push, pull_request], - or an event-configuration map that allows you to schedule a workflow or restrict its execution to certain files, tags, or branch changes.
An event-configuration map could look like this:
on:
  # Trigger the workflow on push or pull request,
  # but only for the main branch
  push:
    branches:
      - main
  pull_request:
    branches:
      - main
  # Also trigger on page_build, as well as release created events
  page_build:
  release:
    types: # This configuration doesn't affect the page_build event above
- createdAn event triggers all associated activities unless you specify one or more activity types.
For a complete list of events and their activity types, see the GitHub documentation: Events that trigger workflows.
A workflow must contain at least one job. A job is a section of the workflow associated with a runner.
A runner can be hosted by GitHub or self-hosted, and the job can run on a machine or inside a container. You specify the runner with the runs-on: attribute.
In this example, you indicate that the job should run on ubuntu-latest.
Each job contains steps to execute. In our example, the step uses the action actions/checkout@v1 to check out the repository.
What’s interesting here is the value uses: ./action-a, which corresponds to the path to the containerized action you defined in an action.yml file.
The last part of this workflow file defines the variable MY_NAME for this workflow.
Remember that the containerized action expected an input called MY_NAME.
For more information on workflow syntax, see: Workflow syntax for GitHub Actions.
GitHub-hosted vs self-hosted runners
We briefly mentioned that runners are associated with a job.
A runner is simply a server on which the GitHub Actions Runner application is installed.
In the previous example, the attribute runs-on: ubuntu-latest indicates that the job will run on a GitHub-hosted runner in an up-to-date Ubuntu environment.
There are two types of runners:
- GitHub-hosted runners: each job runs in a clean instance of a virtual environment. You specify the environment with
runs-on: {operating-system-version}. - Self-hosted runners: you must specify the
self-hostedlabel, the operating system, and the architecture.
For example, a self-hosted runner on Linux with an ARM32 architecture is specified as:runs-on: [self-hosted, linux, ARM32].
Advantages of different runner types
GitHub-hosted runners are simpler and faster to use but have limited options.
Self-hosted runners are highly configurable and can run on-premises or in the cloud.
They allow you to:
- use custom hardware (more power or memory),
- install software specific to your local network,
- choose an operating system not offered by GitHub.
GitHub Actions usage limits
GitHub Actions imposes certain usage limits depending on your GitHub plan and the type of runner used (hosted or self-hosted).
For more information, see: Usage limits, billing, and administration.
Large-capacity GitHub-hosted runners
GitHub offers more powerful runners for workflows that require additional resources.
These runners provide more CPU, memory, and disk space than standard runners.
They are designed to efficiently run resource-intensive workflows, such as:
- Building large codebases
- Running complete test suites (integration, end-to-end)
- Processing large datasets (analytics, machine learning)
- Building applications with many dependencies
- High-performance simulations or computational modeling
- Video encoding, rendering, or media processing
Runner sizes and labels
Large-capacity runners are available in multiple configurations (vCPU, RAM, SSD).
To use them, specify the runner label in the runs-on attribute of your workflow file.
Example: to use a runner with 16 vCPUs and 64 GB of RAM, specify:
jobs:
  build:
    runs-on: ubuntu-latest-16core
    steps:
      - uses: actions/checkout@v2
      - name: Build project
run: make buildThese larger runners maintain compatibility with existing workflows.
They include the same preinstalled tools as the standard ubuntu-latest runners.
For more information on runner sizes for larger runners, see the GitHub documentation.
Managing more powerful runners
GitHub provides tools to efficiently manage larger runners, ensuring optimal resource usage and cost control. Here are some key aspects of this management:
Usage monitoring
You can monitor the usage of more powerful runners through the GitHub Actions usage page in your repository or organization settings.
This page provides information on:
- the number of jobs executed,
- the total runtime,
- the associated costs.
Access management
To control access to these runners, you can configure policies at the repository or organization level.
This ensures that only authorized workflows or teams can use these high-resource runners.
Cost management
More powerful runners incur additional costs based on their usage.
Here are some suggestions to better manage these costs:
- Use them only for workflows that require high resources.
- Reduce execution time by optimizing your workflows.
- Regularly monitor billing details to track expenses.
Scaling workflows
If your workflows frequently require more powerful runners, consider the following strategies:
- Use self-hosted runners for predictable workloads.
- Split workflows into smaller jobs to distribute the load across standard runners.
